- Why did Roy take over this Scanning FAQ?
- To BMP, to GIF, or to JPG? That is the question!
- Why are some of the pics in the auction so big? ...
- What is Resolution?
- What Resolution should I use?
- How do I control the size of my image files?
- Why do I lose the sharpness of a scan when I reduce the image size smaller than the original?
- Where can I get IrfanView?
Why did Roy take over this Scanning FAQ?
'cause I just couldn't stand it any more. People seem to be having so many problems I could no longer sit on the sidelines. We make about 1500 scans every month, so I guess I know a few tricks I can pass on. Unfortunately, I don't have a lot of extra time any more, and this can be a complex subject, so my answers may not go into a great deal of depth on each question. I'll be more inclined to give some basic direction and then point you to a URL or to the Help files in your Scanning software -- armed with a little more information so you know what to look for. Hope you find that useful!
Top
To BMP, to GIF, or to JPG? That is the question!
Image files are created in different formats. The format is identified by the "extension" in the filename -- the part of the file name after the period. (We talk about them as *.bmp, *.gif and *.jpg files, where the "*" stands for the rest of the filename before the period).
The extension goes along with the format in which you save a file. You can't just call a BMP file myfile.jpg and expect it to be a JPG. (People try this all the time!) You must instruct your software to Save As a JPG (or as a GIF or BMP, etc). so the first thing is to look at the Save as command in your software and find the "Save as File Type" box.
Which format to use? That's actually quite easy. For stamps, covers, photos, and anything else that needs a full range of color, you should always use JPG for the Internet. Browsers can only read two kinds of image files: GIF and JPG. (That means BMPs, TIFFs and anything else is right outta here!) Gifs are limited to 256 colors and create large file sizes for pictures of "real" objects. They are suitable only for small icons with limited colors. JPGs allow compression of "real" photos into very manageable file sizes. So for your auction pictures -- to JPG is the answer!
Top
Why are some of the pics in the auction so big? ...
... They must magnify them 300% to 500% or something. We end up scrolling to see all of the picture.
The only answer I have to that is that "They're not doing it right", but what they are doing to get that size and (usually) poor resolution is a mystery to me. It clearly involves a misuse of their software, but it's hard to figure out when you don't know the software or the steps they are taking. Now if someone who was doing this asked for help in fixing it, we might be able to troubleshoot the problem.
H. Poling offered the following advice:
The size that the pictures appear on the screen are a function of the number of pixels along the height and width of the image and resolution in pixels per inch. Pictures of large stamp lots that seem to work well in the auctions have around 800 pixels [Roy's note: That's a little large - it's about 80% of the screen for most users, and 100% of the screen for users who still use 800 x 600 screen setting -- 600 pixels wide is a better number as far as your webmaster is concerned!] the long side and around 75 pixels per inch. Pictures of just a few stamps can be shrunk to 300 pixels on the long side and have around 200 pixels per inch to improve visual clarity. These settings result in file sizes within the Stamporama boundaries.
I suspect that the huge pictures are being created by obtaining / scanning the stamps at high resolution (which is what you want for your own archives) in some format such as "bitmap" (.bmp), then using an image editor to resize and save in "Joint Photographic Experts Group" (.jpg) format without checking the resolution the editor is going to use to prepare the output file. In fairness, some image editors are not particularly obvious where the user can adjust resolution / image size.
To give you an idea what to look for, note that I use MS Digitial Image, which presents three choices for "Resize Image" in a single dialog box:
Image size in (inches/cm/mm)
Pixel dimensions in (number of pixels)
Resolution in (pixels/in)
The user gets to adjust two of the three. I would set Pixel dimensions and resolution to fit good Stamporama practice and let the Image size float to its proper value. You, of course, will need to translate these parameters to whatever your image editor provides. These are sometimes found under tools for formatting the image in the workspace and are sometimes part of the properties for exporting/saving files.
Another option for those scanning their own images would be to manually adjust the scan settings to a lower resolution. In any case, it is good practice to verify that the images look right before sending them to Stamporama by simply viewing them on your web browser. (In your browser, choose File/Open/(navigate through the directory structure to the image file)).
Top
What is Resolution?
Your scanner converts an image into a number of adjacent "pixels", or individual dots of color. The greater the density of these pixels, the more detail that can be seen on the final image. This is "resolution" and is measured in "Dots per Inch", or "dpi". That's why the salesman talked you into getitng the highest "dpi" scanner available, right? Guess what? Unless you are going to do extreme closeups of very small areas, or are preparing images for print, you won't need all that resolution! I don't think I have ever made a scan of a stamp or cover at greater than 800 dpi, and that was not an entire stamp, just a small detail I wanted to show.
Top
What Resolution should I use?
This answer applies only to pictures you want to present on the internet, on your (or somebody else's) monitor. Images intended for printout require higher resolutions because printers have much higher resolutions than monitors.
The resolution you use in scanning determines not only the detail you can see, but also the apparent size on the viewer's screen. Lets take a stamp that is 2 inches by 1 inch in dimensions, (5 cm x 2.5 cm) -- a somewhat larger commemorative size. Let's say you use a resolution of 150 dpi. Your scanner will convert this into an image that is 300 dots x 150 dots (pixels) in size, and the file size will be the same for everybody who looks at this image on their monitor. But will they all see the same apparent image? NO!
A monitor knows nothing about "inches" or "centimeters" or any other unit of dimension. All it knows about are pixels. It lines them up as instructed and out comes the image. The ultimate "size" of an image on a user's screen depends on the settings and physical size of his monitor. As an example, I an currently working on a monitor that has a 12.5 inch wide viewing area and is set at a resoluton of 1024 x 768 (the currently most popular settting -- 2nd most popular is 800 x 600). At these settings, my monitor is displaying 82 pixels per inch across the viewing area (1024 dots across the entire screen divided by 12.5 inches screen width). Thus, your stamp image (300 dots wide) will appear as an image that is 3.6 inches wide (300 dots / 82 dots per inch), or about 180% actual size. Another way of looking at it is that it will take up 29% of the width of my screen. But is this the same for everybody? No!
My "other" computer uses an older monitor that is set at 800 x 600 resolution. It has a viewing width of only 11.5 inches. How big will your stamp look on this monitor? Let's work it out. 800 dots across the screen divided by 11.5 inches = 70 dots per inch. Width of your stamp image? 300 dots / 70 dots per inch = 4.3 inches. Note that it will appear physically bigger on this monitor, but it won't look sharper (in fact it will be less sharp) because the same visual information is simply spread over a larger area.
So, finally, an answer to your question -- what resolution to use? It depends! Think about how large you would like the image to appear on a user's monitor. "Actual size" can't be accomplished, because everybody is using different monitors with different settings, but you can use some discretion. Note from the calculations above that "actual size" for my two monitors will be either 70 dpi or 82 dpi, so 75 dpi is a nice medium that will approximate "actual size" on about 90% of monitors in use. (We use this resolution for all our covers).
Individual stamps look better when somewhat enlarged. I like 200 dpi for single stamps, 125 dpi for a 5" x 3" stockcard of stamps (fits the screen nicely). Unless you are enlarging a small area of a stamp, there is seldom a reason to use higher than 300 dpi. Think about it! at 800 dpi your 2 inch wide stamp would appear on my screen as almost 20 inches wide (800 dpi x 2 inches / 82 dots per inch on my monitor = 19.5 inches)-- in other words I would be able to see only half of it at a time!
So, think about the size of the object you are scanning and the size you want it to appear. If you decide to do single stamps at 150 dpi, don't assume you can use the same resolution for an entire stockpage! Nobody will be able to view it comfortably!
Top
How do I control the size of my image files?
First, it is important to understand that we are not talking about the apparent dimensions of an image. We are talking about how much disk space an image file takes up -- measured in kilobytes (kB). File size is important! First of all, file size determines how long it takes to download an image to a user's computer from the internet. It is very annoying to wait for a 300kB image to download, especially if the image could have been saved with almost the same quality in only 30kB! Broadband users (cable modems etc) are often guilty of forgetting this because their download speeds are so fast they don't really notice it, but it makes a huge difference to dial-up users on a 56k modem. That 300kB file would take about 2 minutes to download, compared to 12 seconds for a 30kB file! Secondly, many sites limit the size of uploads to prevent their available storage space from being used up too quickly. Stamporama has a 30kB limit on image uploads to the Discussion Board, and 150kB limit for auction pictures that are hosted on the Stamporama server.
File size is determined by three main factors:
1) The actual size of the item being scanned
2) the resolution used for scanning
3) the JPEG compression setting used in the software.
One might think that there is nothing that can be done about the size of the item being scanned but that is not quite true. Many times, in the Stamporama auction, we have seen scans of entire stock cards, when only one stamp was being pictured. All that waste space around the stamp takes time to download! The word is "Crop"! Cropping means to cut a piece out of an image and discard the rest. If you don't know how to do it, look it up in your software manual or "Help" files!
For a discussion of Resolution, see the question above.
The most frequently misunderstood factor in controlling file size is "JPEG compression". When you save a file as a JPEG (see questions about "Format" elsewhere in this FAQ), the file is "compressed" in order to make it smaller. This is a very complicated algorithm that involves throwing out some visual information in order to reduce the size of the file while trying to retain as much of the initial clarity as possible. However, it is a trade off. Some detail is always lost. The goal is to retain an acceptable level of sharpness while reducing the file size as much as possible. All software that creates JPEG file formats has a user selectable option to control this compression. Sometimes it is labelled "Compression", sometimes "Quality". Sometimes it is a scale of 1 to 100, sometimes 1 to 256. To make matters worse, most software uses 1 to 100 with "100 " meaning "best quality, least compression", but some software reverses that and uses a scale of "Compression" where "100" means "most compression, least quality". You will have to explore your software, find out where the JPEG compression setting is made, and what kind of a scale is used. (I like Irfanview, which uses a "Quality" scale of 1 to 100, with "100 being "least compression/ highest quality". Further discussion will assume this scale. If yours is different, make the mental adjustment.)
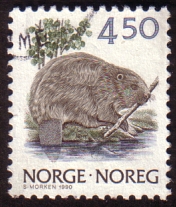 Quality: 100 File Size: 39.7 kB | 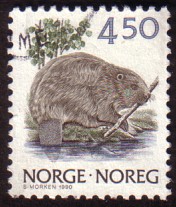 Quality: 90 File Size: 17.8 kB | 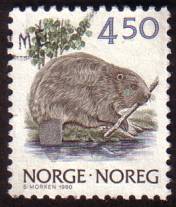 Quality: 70 File Size: 9.8 kB |
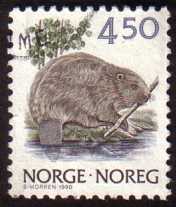 Quality: 50 File Size: 7.2 kB |  Quality: 30 File Size: 5.3 kB | 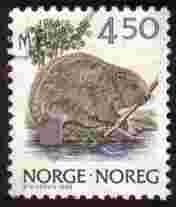 Quality: 10 File Size: 2.7 kB |
Note that the greatest file size saving, with the least loss of detail comes in the range from 100 to 70. My own experience leads me to use 70% quality as the best overall compression factor, but for specific needs, I will often vary this from 50% to 90%.
Top
Why do I lose the sharpness of a scan when I reduce the image size smaller than the original?
The smallest unit of information on your monitor is the "pixel" -- the dots of color on your screen. When you reduce the size of an original scan, you are not making the pixels smaller, you are reducing the number of pixels that particular image uses. In order to maintain the appearance of the image in the smaller size, your software uses an algorithm to drop out pixels and to blend the color and brightness information (which is really all the information an individual pixel can carry) into adjacent pixels -- rather than just dropping out every other pixel! That blending causes a smoothing of the image -- the loss of sharpness you are referring to.
Different pieces of software use different algorithms to accomplish the the reduction. My own favourite "IrfanView" offers two reduction methods: "Resize" and "Resample". Of these two, resample is the better one. It's slightly slower, but results in a much better image. All software may not offer the choice.
In order to reverse some of the blending caused by reduction, look for an option called "Sharpen". It may be in the "Filters" or "Effects" menu area in your software. This increases the contrast between adjacent pixels and does wonders to bring back the image.
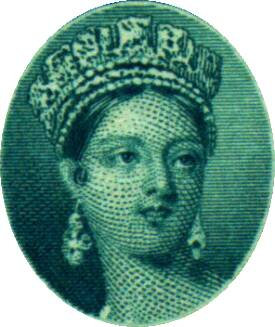 Original scan | 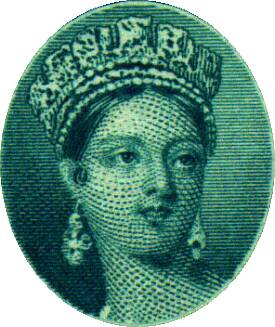 Sharpened 20 using IRFanView |
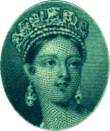 Resampled at 40% of original size | 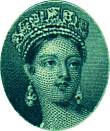 Same as at left, but sharpened 20 |
Top
Where can I get IrfanView?
Irfanview is my own favourite image manipulation software. I use about three different bits of software to do different jobs, and this is the best at resizing, sharpening images and adjusting colours and contrast. It also has a "batch" mode that allows me to make the same changes to hundreds of files at a time. It's free software, available as a download from the Web here: http://www.irfanview.com/
More coming as time allows. Ask your questions and give me something to work with!
Top
